These tips are intended to help expert users get more out of Hyper Plan. A quick start guide to Hyper Plan is available here. A quick start guide to the Professional Edition is available here.
Images
Images can be a useful visual cue. To add an image to a card, just drag and drop an image file from Windows Explorer (Windows) or the Finder (Mac) or your web browser directly on to the card in the Cards pane. You can also create a new card with an image by dragging and dropping an image away from any existing cards. If you have already added an image to a plan, you can select it from the Image drop-down list in the Edit Card window. You can control the visibility, size and position of images in the Show Properties section.
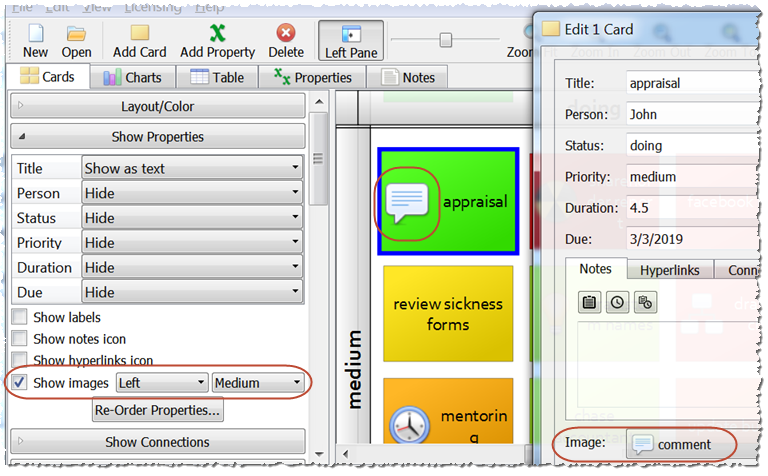
Hyper Plan can accept images of type PNG, JPG and BMP. Images larger than 128x128 will be scaled to 128x128 inside Hyper Plan (the original file is unchanged).
Magnification
You can magnify the area under the cursor. Click the button and hover the cursor over a card.
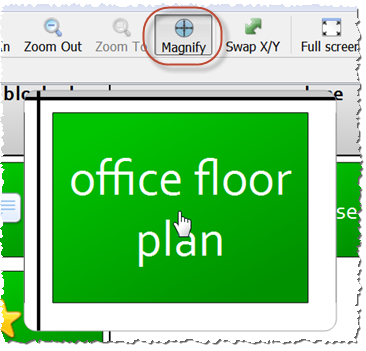
Click the magnify button again (or press the Escape key) to disable magnification.
Icon overlay
Select View>Icon Overlay to create, edit and delete cards (and add connections in the Professional edition) in the Cards pane, using icons that appear as you hover over cards and cells.
![]()
Searching
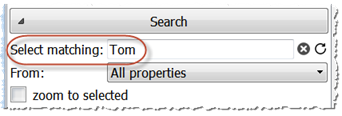
You can use the Search section of the Cards pane to select cards with text that matches your search. You can optionally zoom in on selected cards. Press the refresh button to re-run the search. The search is not case-sensitive.
Stored views
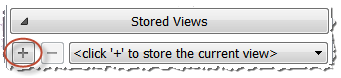
Each setting of Layout/Color, Show Properties and Filter in the Cards pane is a ‘view’. To save the current view, go to the Cards tab, click the + button under Stored Views and give the view a name.
You can retrieve this view at any time by selecting it from the Stored View section drop-down list or the main View menu. You can change to the next or previous view using the keyboard shortcuts Ctrl+[ (Windows) / Cmd+[ (Mac) and Ctrl+] (Windows) / Cmd+] (Mac). Or you can select the Nth view using the keyboard shortcut Ctrl+<N> (Windows) / Cmd+<N> (Mac) where <N> is 1 to 9 (e.g. Ctrl+1 selects the first view on Windows).
Printing and exporting
You can print straight from Hyper Plan by selecting File>Print… . Use File>Page Setup… to change the page size or orientation.
You can export to various formats by selecting File>Export. CSV files can be opened in Excel. SVG format can be edited using vector graphics packages such as Inkscape (free) and Adobe Illustrator (commercial). HTML files an be opened in a web browser.
Opening CSV files
You can read in CSV (comma separated value) files, so you don’t have to re-type everything for Hyper Plan. Just select File>Open then set the file type to CSV files.

Empty rows are ignored. Columns are imported as properties and rows as cards. The first non-empty row is used for the property names. Columns headed Images, Notes and Links (not case-sensitive) are imported as images, notes and hyperlinks respectively. All other columns are imported as standard properties. For example:

You will be given the option to import the CSV data into a new plan or the current plan.
Dates
In the Preferences window you can set the Date order field to choose whether to use DDMMYYYY, MMDDYYYY or YYYYMMDD order for dates and the Date delimiter field to choose your preferred date delimiter.
You can enter dates in a wide range of formats. The names accepted for days of the week and month of the year will depend on your system locale. For example, if your chosen date order is DDMMYYYY and your operating system locale is English, all the following dates will be understood by Hyper Plan:
- 01 January
- 1/Jan/2018
- 01-01-18
- 1.1.18
- today
- tomorrow
- Monday
- mon
- +7
Hover over a date field for more information. Note that these intelligent date values only work if you have explicitly set the property type to ‘Date’. Date properties fields also show a date picker button.
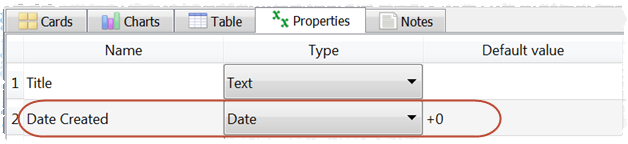
In the example below the ‘Date created’ value will be automatically set to the date of the card’s creation.
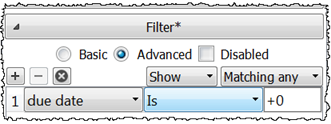
In the example below only cards with a due date of today are shown:
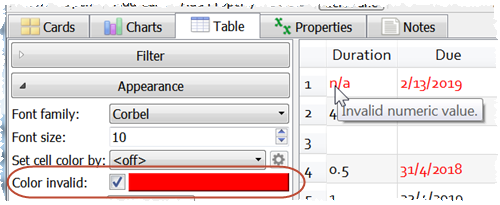
To see any invalid dates check Color invalid in the Appearance section of the Table pane (set Set cell color by to <off>).
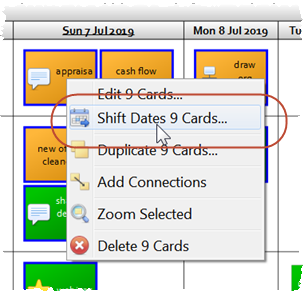
You can shift the dates of multiple cards backwards or forwards by right-clicking on the selected cards and choosing Shift Dates.
Quick add
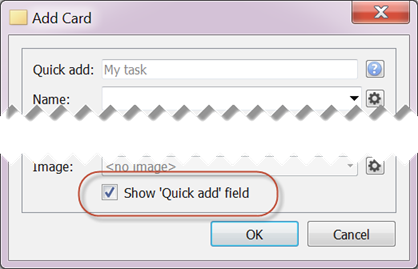
You can use the Quick add field in the Add card window to quickly set properties. Check the Show ‘Quick add’ field check box at the bottom of the Add card window to make the Quick add field appear.
Then type the property names (not case-sensitive) and values separated by commas or semi-colons into the Quick add field. For example:

Values that are not supplied are set to the default value for the property. You can also use abbreviations. For example:
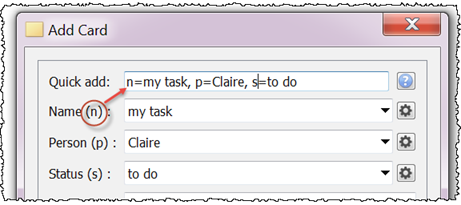
You can even omit the property names and let Hyper Plan try to intelligently work them out from the values. For example:

Press the Return key when you are done or Escape to discard the changes.
Multiple-user/multiple-computer environments
To help Hyper Plan play nicely in a multiple-user/multiple-computer environment:
- It locks your plan while you are modifying it, so that no other program on your network can write to it (Windows only). This ensure your plan file is not corrupted by two programs writing to it at the same time.
- It detects changes made to your plan file by other people/programs and automatically loads these changes. If you are looking at a stored view, this view is maintained.
- If you try to write to a file that someone else has modified, your changes will be saved in a new ‘conflict’ file, so they aren’t lost.
- All the data for a plan is stored in a single plan file. The format is the same on Windows and Mac. This means it can be easily moved between computers and works well with file synchronization systems such as DropBox.
Running from a memory stick
To find out how to run Hyper Plan from a a USB memory stick, or other portable device, please see ‘Can I run Hyper Plan from a memory stick or other portable device?’ in the FAQ.
Keyboard shortcuts
The following keyboard shortcuts are available:
| Windows | Mac | Action |
|---|---|---|
| Ctrl+A | Cmd+A | Select All (Cards pane/ Table pane) |
| Ctrl+B | Cmd+B | Open/close Layout Color Cards (Cards pane) |
| Ctrl+D | Cmd+D | Duplicate card(s) (Cards pane) |
| Ctrl+E | Cmd+E | Edit card(s) (Cards pane) |
| Ctrl+F | Cmd+F | Open/close Filter Cards (Cards pane/Charts pane/Table pane) |
| Ctrl+Shift+F | Full screen | |
| Ctrl+G | Cmd+G | Open/Close Display (Charts pane) |
| Ctrl+H | Replace | |
| Ctrl+I | Cmd+I | Add card |
| Ctrl+Shift+I | Cmd+Shift+I | Add property |
| Ctrl+J | Cmd+J | Open/close Appearance (Cards pane/Charts pane/Table pane) |
| Ctrl+K | Cmd+K | Open/close Show Properties (Cards pane) |
| Ctrl+Shift+K | Cmd+Shift+K | Open/close Show Connections (Cards pane) - Professional Edition only |
| Ctrl+L | Cmd+L | Toggle Left pane (Cards pane/Charts pane/Table pane) |
| Ctrl+M | Cmd+M | Minimize Main window< |
| Alt+M | Alt+M | Toggle magnify cursor (Cards pane) |
| Ctrl+N | Cmd+N | New plan |
| Ctrl+Shift+N | Cmd+Shift+N | New Main window |
| Ctrl+O | Cmd+O | Open plan |
| Ctrl+P | Cmd+P | |
| Ctrl+R | Cmd+R | Open/close Stored Views (Cards pane) |
| Ctrl+Shift+R | Cmd+Shift+R | Open/close Propagate property (Cards pane) - Professional Edition only |
| Ctrl+S | Cmd+S | Open/close Search Cards (Cards pane) |
| Ctrl+T | Cmd+T | Show/hide tool tips (Cards pane) |
| Ctrl+Shift+T | Cmd+Shift+T | Show/hide toolbar |
| Ctrl+U | Cmd+U | Duplicate plan |
| Ctrl+Y | Cmd+Shift+Z | Redo |
| Ctrl+Z | Cmd+Z | Undo |
| Ctrl+. | Cmd+. | Show/hide icon overlay (Cards pane) |
| Ctrl+, | Cmd+, | Preferences |
| Ctrl+; | Cmd+; | Add Connection (Cards pane) |
| Alt+; | Alt+; | Explore Connections (Cards pane/Table pane) - Professional Edition only |
| Ctrl+= | Cmd+= | Zoom fit (Cards pane) |
| Ctrl++ | Cmd++ | Zoom in (Cards pane) |
| Ctrl+- | Cmd+- | Zoom out (Cards pane) |
| Ctrl+/ | Cmd+/ | Zoom to selected (Cards pane) |
| Ctrl+\ | Cmd+\ | Swap x/y (Cards pane) |
| Ctrl+[ | Cmd+[ | Previous stored view (Cards pane) |
| Ctrl+] | Cmd+] | Next stored view (Cards pane) |
| Ctrl+1 … Ctrl+9 | Cmd+1 .. Cmd+9 | Choose numbered stored view (Cards pane) |
| Left arrow | Left arrow | Next chart (when zoomed in) (Charts pane) |
| Right arrow | Right arrow | Previous chart (when zoomed in) (Charts pane) |
| Ctrl+Left arrow | Cmd+Left arrow | Move focus to previous card in cell/previous column or connected parent (Cards pane) |
| Ctrl+Right arrow | Cmd+Right arrow | Move focus to next card in cell/next column or next connected sibling (Cards pane) |
| Ctrl+Up arrow | Cmd+Up arrow | Move focus to previous card in cell/previous row or previous connected sibling (Cards pane) |
| Ctrl+Down arrow | Cmd+Down arrow | Move focus to next card in cell/next row or connected child (Cards pane) |
| Ctrl+Tab | Change front tab | |
| Del, Backspace | Del, Backspace | Delete selected |
| F1 | F1 | Help |
Drag and drop
The following drag and drop operations are available:
| Item | From | To | Result | Notes |
|---|---|---|---|---|
| plan (.tp) file | Operating System | Cards, Charts or Table panes | plan is opened | |
| .csv file | Operating System | Cards, Charts or Table panes | .csv file is imported | |
| image file | Operating System | card in Cards pane | image added to card | |
| image file | Operating System | Cards, Charts or Table panes | new card with image added | |
| image file | Operating System | Images window | image added to plan | |
| other file | Operating System | card in Cards pane | hyperlink to file added to card | |
| other file | Operating System | Cards, Charts or Table panes | new card with hyperlink to file added | |
| image | Browser | card in Cards pane | image added to card | doesn’t work for all browsers |
| image | Browser | Cards, Charts or Table panes | new card with image added | doesn’t work for all browsers |
| hyperlink | Browser | card in Cards pane | hyperlink added to card | |
| hyperlink | Browser | Cards, Charts or Table panes | new card with hyperlink added | |
| Cards pane column (row) header | column (row) position | another column (row) position | change column (row) order | |
| cards(s) | Cards pane cell | Cards pane cell | X and Y properties of cards are updated | Hold down the Ctrl (Windows)/Cmd (Mac) key while dragging a column (row) of cards to a different column (row) to preserve card rows (columns) |